Thursday, December 18, 2014

always working 33 x 33 inches

I was beginning to wonder if I would EVER finish this,  After I started, I took two weeks off to work in Muncy High, then took over three weeks off to work on my floor.  This mosaic was a bugger.  The shape of the frame seemed to throw me too.  I can't remember if the gear idea or the crow and moon idea came first,  Then, I have NO idea how they got mashed up together.  But as I went along, the mosaic became about my life at that time. It usually does.
 
One of my favorite parts is these resistors.  I had to make this tile twice as I did for almost EVERY feature in this mosaic.  I trashed a moon, light bulb, and crow too. Yeah... resistance, all right!
Of course, that raven (or crow?) is me... awake in the middle of the night, trying to figure out whatever I am working on.  In this case, it was trying to figure out what to combine to get different metal colors, the glass key, what colors of dichroic would make the right electric streak?.
 
Even though the mosaic started out steampunk, it kind of veered toward working things out.  Still semi-steampunk, the key and light bulb were also, YES, symbolic.  I need a fire lit under my ass sometimes too, especially when I struggle this much.  I have a whole set of beetles that I made for this mosaic and didn't use.
Way before I started this mosaic, I bought watch parts (below) to put on my frame. They came from punksrus on etsy.

SO happy now that it's done.  It has a big thumbs up from my fam, which makes me smile.  "Everything will be okay in the end. If it's not okay, it's not the end.”  said Lennon or Coelho.  I say-Even when it doesn't always look like it, things are always working.


Thursday, December 11, 2014

worth the wait

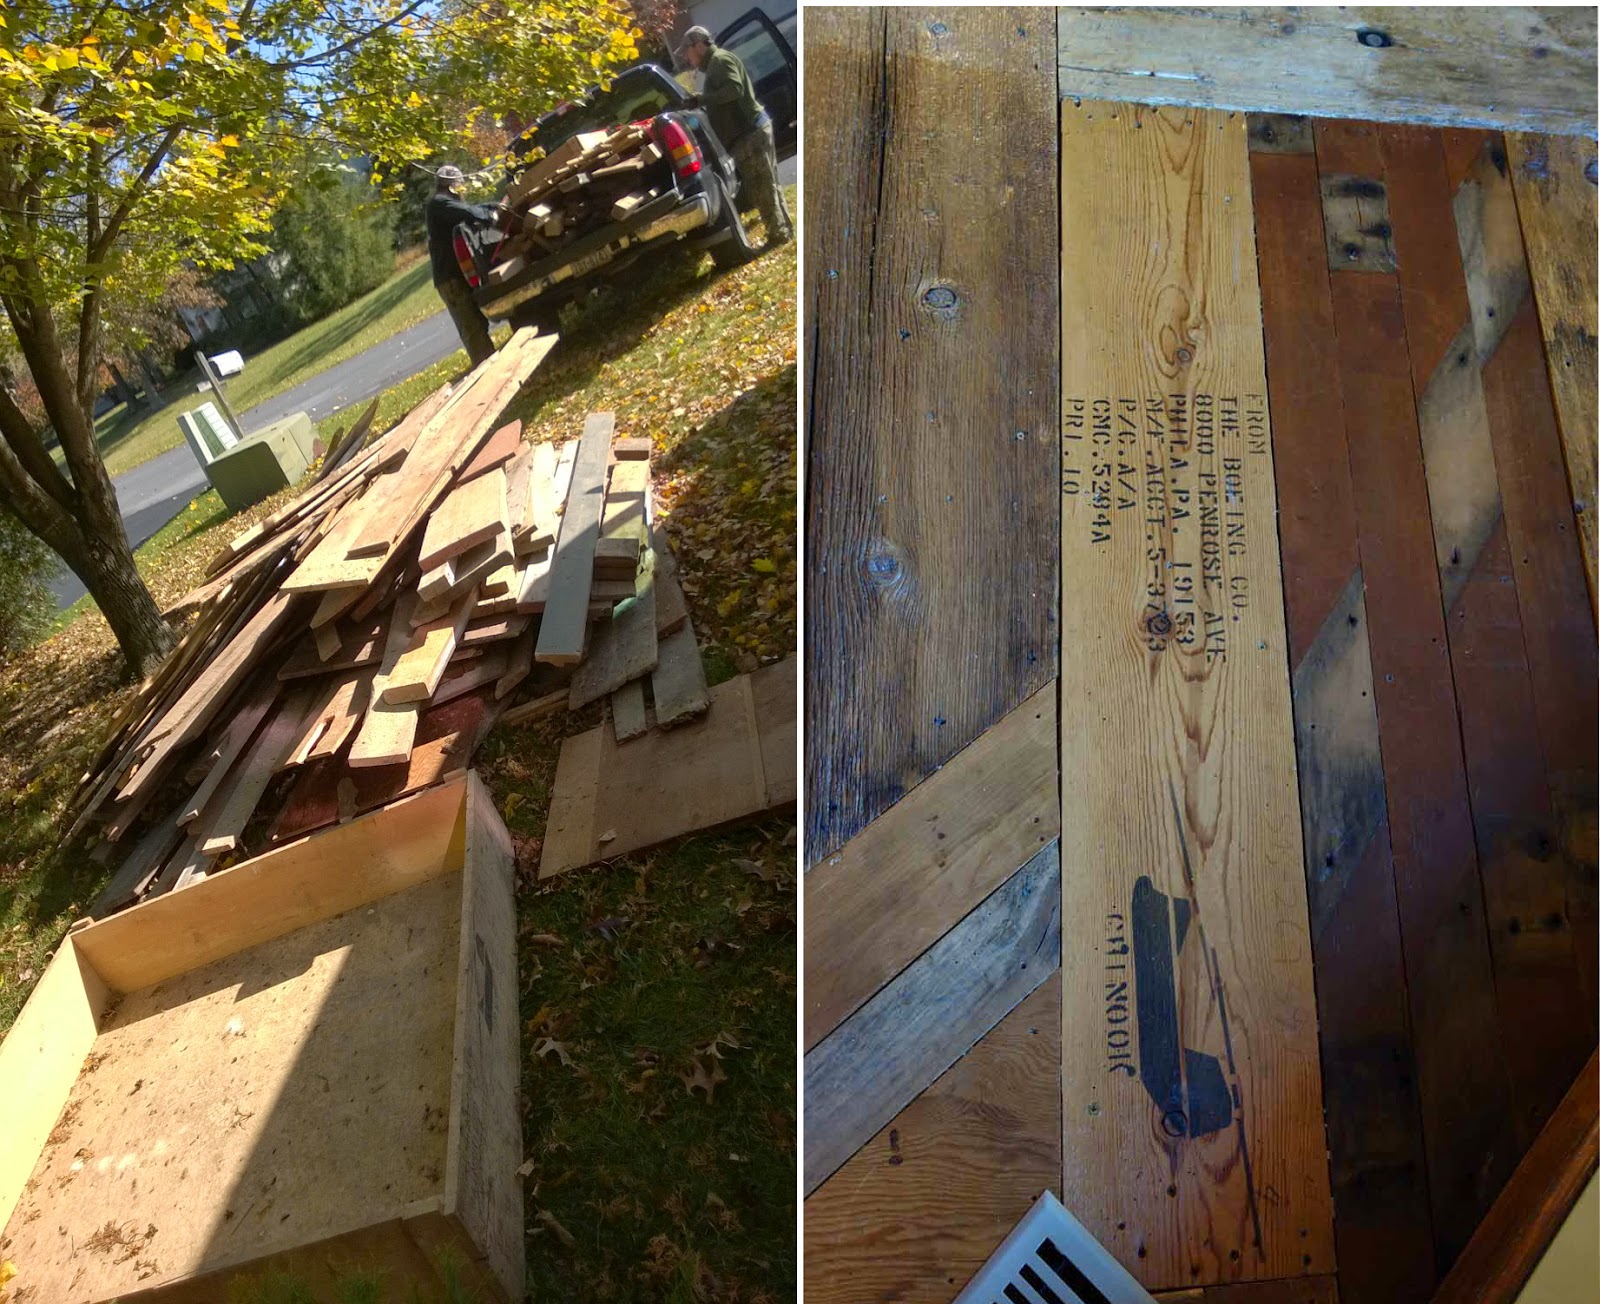
I'll admit.  Sometimes I DO become impatient.  The things I dream are a little outlandish so it takes a while for the Universe to whip this stuff up.   Here's how this floor transpired.  A couple of years ago, I saw this really cool floor in a gallery.  The owners told me they did it themselves with wood from Home Depot!  At the time, we didn't have the money even for that.  As time passed, my ideas changed.  I thought of stenciling the wood to make it look like re-purposed shipping crates, possibly a paint treatment to look like worn off paint, maybe beating the wood up a bit and adding a few screws and stuff to make it interesting.  So imagine me finding all this wood already as I was dreaming about.  I didn't have to fake anything.  Oh, and it was FREE!  Now before you get excited, below are photos of what free wood looks like.  Not too many people will have the patience to transition the below photos into the above photos.  We used engineered wood but the engineering was done by flim and flam (yeah, me and Rob.)  Some of the wood was an inch thick, some was a half inch thick  and sometimes that was in the same board!  And only the wood is free.  You will spend hundreds just on poly and again on underlayment... hardware... yada yada yada.
I have been called bat shit crazy before... this could be the evidence to support that.  Yes, the photo on the left is all guano.  Much of the wood used had all kinds of critter crap on it.  Yeah, power washing in November will freeze your nuts off.  I do think some of my neighbors thought we were insane when we said this pile of wood will be our floor.
 
You can see why small swatches became part of the design.  We worked with what we had. This was one of three piles of wood that were in our houseThey dwindled for weeks till we got done.  We found a lot of square nails.  They were super rusty so it is hard to tell but we think they were machine made, dating them to between 1800 and early 1900's.  We left them where they were in the boards that were used. In places that the wood was too deteriorated to save, we ripped and cut off sometimes four sides of a board, but saved the nails that were in the wasted parts.  Those nails were then added randomly to another board.
We started with a "rainbow" stripe in the middle and then added two more where we knew there would be no furniture covering them. That was to make best use of the few colored boards we had. The dumbbell was to hold a piece of wood together till the wood glue dried. The only sanding was to really pickery wood and then after the poly so it feels wonderful. Not kidding.  See my pretty girl keeping us company?  In this photo, she is about a month past 16 years young.
Above left, you can see one board where the square nails just fell out of the holes, and in the right photo one board had two of the nails get bent and someone just pounded them in. The three in a row were one of the places that we added the nails back in.  Pounding them took the rust off and rounded them a bit.  Hammer dents were mostly us.  If you add my woodworking skills together with Rob's, the sum of that is zilch.  Couple that with the fact that all we used was a bitty circular saw and a small belt sander... a few rotary tools for vent holes and inner corners...YEAH, this was an undertaking.  But now it's done and we LOVE it.
There were holes and voids in the wood but rather than cut them off, we incorporated them into the design, knowing we would fill them later.  This one got my Grandma's junk jewelry and glitter strings in epoxy.
These holes got a nickel, a bottle cap, and buttons with glitter string in the resin.  Another hole got a glass signature tile but my Christmas tree is sitting on it so I can't show you.  I wonder about what the holes may have been for.
We put the lock back into the hole it fell out of and used it somewhere that it would not trip anybody.  This is one of our favorite parts. 
You know I am not above stealing somebody's artwork and dubstepping it into my own.  The top photo is part of a tiny stenciled board we found.  Notice the wormhole wood perpendicular to it.  The bottom looked like a kid had a pen and some spray-paint on ply.  We ran out of wood in the hall and had to mix purchased wood in.  Of course I stained some purchased wood blue.  
This Boeing box was a major score in our book. There were two Chinooks pictured on the box and they were both used.  LOVE that.  I mean, who doesn't think a Chinook is cool??  Right.  That's what I'm sayin'.  The bottom of the box was our working table throughout the project. As we neared the end, parts of it were lobbed off to use in the floor.  The rest will become part of a storage table for in my shop. We also used a piece of ply that has a stencil of Century Lighting from NY, NY.  I couldn't find any info on them when I googled.
We took up tired nasty carpet and laid down tired nasty wood.  Just add four coats of high -traffic poly and there you go.  We kept irregular edges and then filled some of the voids between boards with black glass and black silicone so nobody would fall in.  Bonz is showing you where the coffee table goes.  And below is the hall.  Then the true test of art-  Does it match my sofa???   Ah ha ha ha ha!  My sofa and my walls are green even though you cannot tell from these photos.  Matching is boring. I know this is not everyone's taste... but I love this life.
PS... This is a terrible photo of fabulous Paula Lewis work on the back wall of my hall.  In December, my tree eclipses the spot where her work usually hangs.  Make your house YOUR house.  Fill it with what you love.  Now back to my shop where I belong.

Friday, November 7, 2014

still working...

 
This mosaic is SO kicking my ass.  Normally these take me around 6 weeks to finish.  I was thinking this would be about 8 because there are a lot of features that I needed to figure out.  The octagon shape took some adjusting to also.  So many things in this mosaic were a re-do.  My scrap pile has a moon, a raven, and a tile with those resistors.  I'm trying to make an old light bulb and right now I'm on the second one and still don't know if I can do it.  Bah!


Friday, October 10, 2014

mhs represent!


How do I even pick photos to post here?  I would like to post about thirty.  There's just NO WAY for you to see everything in this mosaic.  I mean, I was present for the entire fabrication and I was still discovering new details the last day.  Ahead of time, it was decided that we would work with mostly school colors and let each kid make their own glass tile. We took these tiles, about 100, and mixed them up with regular stained glass to complete the design.

In the bottom photo is the youngest class (seventh graders) that worked on the mosaic.  Every class produced stellar tiles... not even kidding!  There was a ballerina and a flamenco dancer; a bike and a snowman; superman and batman logos.  There were soccer balls, basketballs, baseballs, footballs and pom poms.  There was a donut and a circuit board.  Phillies, Broncos and a top hat... a turtle, a horse, birds, and SO many flowers.

Again, I will thank the Pennsylvania Council on the Arts for their generous donation covering a huge chunk of the money that made this Muncy program possible.  I am so unbelievably grateful to have been part of this.  So tired... so happy.  Looking forward to being in my shop tomorrow, aaahhhhhhh.

Sunday, August 10, 2014

comfortable

Ah ha ha!  This sea witch is DONE.  At 36 x 20 inches, "comfortable ( the fushigi life )" was way harder than I thought but a good experience regardless.  In the past few years, when I complete a mosaic, I give you the skinny about what's what in the thought process of how it came to be.  This one was so personal that I think I will let it remain personal... for now.  I will let you see what you will in this work. 


Tomorrow, I start on a new one.  I still am not sure if I want to go steampunk or ferns and fungus.  I think I am lichen the ferns and fungus though.  Fiddleheads?

Monday, July 14, 2014

back in the saddle again

 Feels SO good to be mosaicking again.  I took time away from my studio for a residency.  Then my husband and I were in Denver to see my son and daughter-in-law for 10 fantastic days.  I spent a day with an amazing young artist and her equally amazing mom.  So after that, I immediately resumed work on my selfie.  This morning, Bonsai gives me that skewed sideways smile and says, "Girl, you are nailing this mosaic.  You didn't even need to be so honest about the wrinkle between your eyebrows because nobody notices it but you."  I told him thank you and immediately made him employee of the month.  This is so much evidence to me that dogs, particularly shih tzus, are smarter than they are given credit for.  Anyhoo, the hardest part of this mosaic is DONE.  Starting on dots and stripes tomorrow.  You knew that was coming!    
 

Tuesday, June 10, 2014

self, self, selfie

If you are trying to do a portrait of a woman over 50, good luck trying to please her.  In addition to that, what artist is happy with their work?  This is a tough one, seriously.  I will tell you the truth.  I showed this to my own mother this week and she did not realize it was supposed to be me.  Frightening.  Like does that mean I did a bad job?  ... or that I am making it "wrong" because I see myself different than others do?  or that my ma is losing it?  So this will probably take a while.  Besides, I start another residency Monday.  WOOHOOO!